How to Turn on Laptop Camera on Windows 7
In order to run telecommunication apps like Skype or video recorders on your device or on YouTube, you will need a webcam. This is where the integrated laptop webcams come in handy. By being fitted on the top bezel, you do not have to carry a camera with you. You can also easily record your YouTube videos etc. However, it is not all smooth sailing for some users. The webcam has failed several for many people. While this might happen suddenly after prior use for some people, others have this problem from the first use of their PC. Attempting to open the webcam in the manufacturer webcam application (Dell Webcam center, or Lenovo Setting etc.) will only show a blank output with a crossed-out camera. By extension, no webcam or camera application will work.
This problem is common in Dell and Lenovo users, but it is equally annoying in other laptops like hp, Asus, Acer among others. This article will explain this problem and give you proven solutions.
Why your webcam will not work
It is really quite simple why your camera won't work. The obvious reason is that your drivers are not compatible with your webcam. If you are sure you have the correct drivers, then this could boil down to a deactivated/disabled webcam. In some laptops, the webcam can be disabled with a combination of keys, or by pressing a function key (F1 – F12 Keys). Manufacturer webcam applications also have the ability to turn off/disable the webcam. This is known as the privacy mode and it will stop any app from accessing your webcam. In less often situations, your webcam might have a loose connection probably after a mechanical knock or when you attempted a repair. Sometimes, the "No cameras attached" error might be shown or imaging devices missing message might be shown in the device manager, those are separate issues and we have addressed them separately. Furthermore, below are some solutions to this problem.
If your webcam will work on other apps but will not work on Skype, you can find the solution to that from our fix at https://appuals.com/fix-skype-video-not-working/.
If your webcam stopped working after the Windows 10 Anniversary update, you can resolve the issue by following our guide https://appuals.com/webcam-not-working-after-windows-10-anniversay-update/.
Sometimes your webcam light comes on but the webcam output is blank on Lenovo PC.
Method 1: Enable your camera using the keyboard
Laptop keyboards have a quick way of shutting down or disabling devices on your PC. With the numerous reports of camera hacking, laptop manufacturers introduced this safety option. It can include a combination of keys, or a simple press of a function key.
Trying the combination Fn + F6 or Fn + F9 or simply press F8 or F10. This will not work for you if you do not see an icon of a camera in the F6, F8, F9 or F10 keys. Simply locate this icon and use the Fn combination or a simple press of the key with the icon.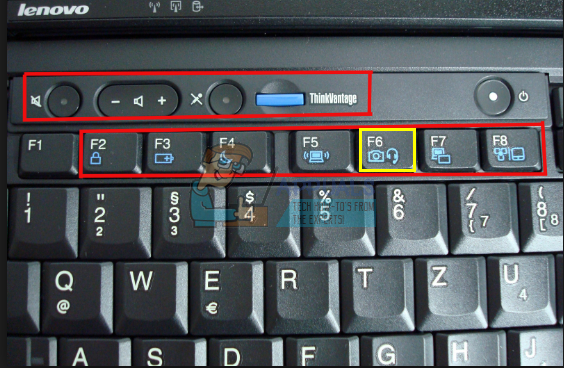
Method 2: Update your manufacturer webcam application
Outdated webcam applications might have trouble accessing the webcam since drivers change. You might want to try updating your webcam software. These utilities are sometimes essential for your webcam to work. Dell users can get a newer version of 'Dell Webcam Central' utility here while Lenovo users can get the 'Lenovo Settings' utility here or from the Microsoft App store here for Windows 10 users. Install the app and restart your PC.
Method 3: Enable your camera in the manufacturer application: Lenovo Settings
Your manufacturer webcam utility applications have the ability to disable integrated cameras. You will need to enable the webcam from within these applications. To do this in Lenovo:
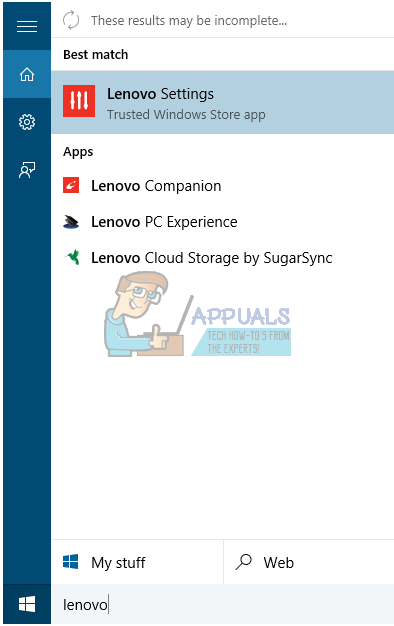
- Open the Windows Start menu and type 'Lenovo; until Lenovo, Settings appear and open it (if you do not have Lenovo settings installed, you can find it on the Windows Store here or from the Lenovo website here.
- Expand the window so that the top icons are displayed and click on CAMERA at the top of the window.

- Scroll to the bottom of the settings page under PRIVACY MODE and change Turn Privacy Mode to OFF.
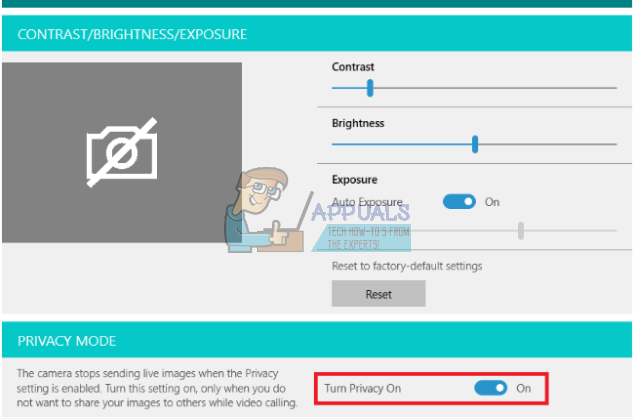
- If the camera is still crossed off, click on it to activate it.
If you are on Windows 7, you can enable your camera by going to Control Panel -> Lenovo Web Conferencing > Click the button "Show my Image" and your camera should now work.
In Windows 10, you can choose apps that access your webcam. Go to settings (Windows key + I) > Privacy > Camera > 'Let apps use my camera hardware' > ON. You can then choose which apps can access the webcam.
If you still have trouble with the webcam in Windows 8/8.1 Lenovo PC, try our solution from https://appuals.com/lenovo-camera-not-working-shows-a-line-through-it/.
Method 4: Update your drivers
Bad drivers are a common issue with your webcam not working. You will need the drivers from your manufacturer. Dell users can go here, hp users can go here, Toshiba users can go here, Acer users can go here, while Lenovo users can go here.
- Go to your laptop manufacturer website
- You will likely be asked for your service tag or serial number. You can find this on a sticker at the bottom of your laptop. If the sticker is damaged you can find the service tag using cmdlets that read your BIOS. Click start > type PowerShell > Open PowerShell > Type "Get-WmiObject win32_bios" (without the quotes) and press enter. You will be shown your Serial Number/Service Tag. You can also choose to search for your laptop manually or use an auto-detect service.

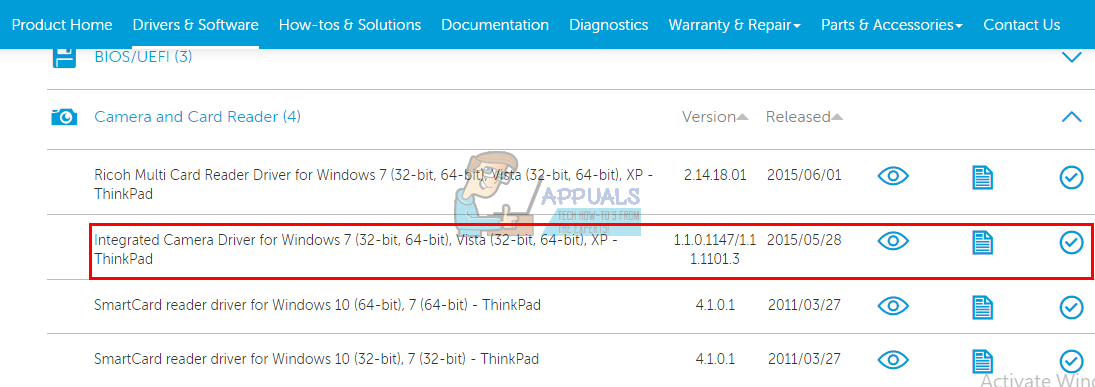
- Type in your service tag and submit it. Your manufacturer will find your laptop model for you and present you with the updates and drivers.

- Search for your webcam drivers that are meant for your OS (Windows 10, 8, 7 64 bit or 32 bit). Do nor download BETA drivers since these are not stable.
- Install the drivers (if you get a message that your drivers are up to date or newer than the version you are installing go to Device Manager > Imaging Devices > Right-click the webcam and uninstall > Install the downloaded drivers)
- Restart your PC
Method 5: Reseat your webcam connection
If your laptop was dropped or sustained any mechanical shock, the integrated webcam might get loose. The connector might also have been loosely attached or may have not have been reattached correctly the last time the laptop was taken apart.
Simply pry you're your laptop screen bezel. You might need to remove a few screws around it first depending on your laptop model. Unplug your webcam connector and then plug it back all the way in before mounting back the bezel. Here are a few tutorials on how to reseat your integrated webcam. If you are not comfortable opening your computer, get a professional to do it.
Method 6: Change Camera Privacy Settings
In some cases, the issue might be encountered if Windows is configured in such a way that it is preventing certain apps from accessing the camera. Therefore, in this step, we will be changing certain privacy settings to work around this issue. For that:
- Press "Windows" + "I" to open the settings.
- Click on "Privacy" and then select "Camera" from the left pane.

Selecting "Privacy" - Select the "Change" button under the "Change Access for this Device" heading.
- Turn the toggle ON to allow access.
- Also, turn the "Allow Apps to Access your Camera" toggle on and then scroll down.
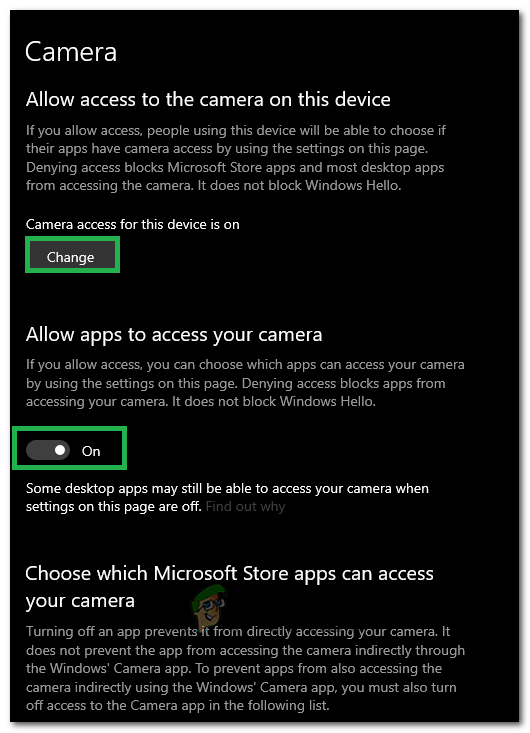
Configuring Settings - Allow the apps to use your camera and exit settings.
- Check to see if the issue persists.

Kevin is a dynamic and self-motivated information technology professional, with a Thorough knowledge of all facets pertaining to network infrastructure design, implementation and administration. Superior record of delivering simultaneous large-scale mission critical projects on time and under budget.
How to Turn on Laptop Camera on Windows 7
Source: https://appuals.com/laptop-camera-not-working-on-windows-7-8-and-10/